
Forensics is the process of collecting and examining evidence during an investigation. The forensic system allows personnel of the American Bureau of Investigation (ABI) and New York Police Department (NYPD) to collect fingerprints and DNA, test for gunshot residue, examine bodies, and compare evidence through the forensic database.
This guide covers the equipment and controls used to process a crime scene and organize the resulting evidence into a case.
Equipment
Before attending a crime scene, ensure that you have the necessary equipment:
- Camera
- Evidence Bags
- Crime Scene Marking Case
- Flashlight
- Forensic Chalk
- Police Tape
- Gunshot Residue Test (GSR) Kit
- Fingerprint Latent Kit
- Blue Gloves
- Forensic Hazmat Suit
- Body Bag
Equipment is available from the Evidence or Detective NPC. Wear your gloves and forensic protective clothing before handling evidence, and check that you have enough backing cards to collect the samples you need.
Fingerprint Kit
Despite its name, the Fingerprinting Kit is used to collect both fingerprints and blood samples. Each kit contains eight backing cards.
To remove a backing card, open your inventory, right-click the Fingerprinting Kit, and select Take Card. The card will appear as a separate inventory item. Use the card to collect a sample; the kit itself is also used to apply latent powder to doors.
Supported Evidence
The kit can be used to:
- Lift fingerprints from droppable items, except drugs themselves. Drug processors can still be fingerprinted.
- Lift fingerprints from doors after applying latent powder.
- Lift fingerprints from bullet casings left after a PK and secured in an evidence bag.
- Collect fingerprints from living people using the appropriate collection procedure.
- Take blood samples from living people or corpses.
- Take blood samples from supported blood stains left after a PK.
A PK is a permanent kill. See PK Guidelines for the rules governing permanent kills.
Collecting Samples from People
Before collecting a sample from a living person, establish the required consent or other authority under your faction's procedures and the applicable in-character law. The subject must be cuffed for the collection mechanic to work.
This guide explains how to use the system. It does not grant additional powers to detain someone or collect their samples. Refer to Important Documents and your faction's procedures when determining your authority.
Fingerprints
Collecting Fingerprints from Items
- Take a backing card from your Fingerprinting Kit.
- Look directly at the item you want to examine.
- Open your inventory while keeping the item targeted.
- Right-click the backing card and select Take fingerprint from item.
- Check the resulting fingerprint card and record where the sample came from.
-
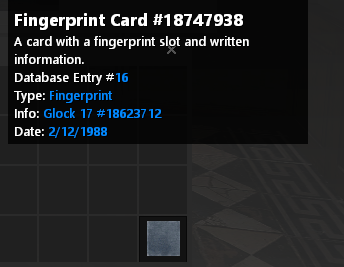
A collected fingerprint card showing its card number, database entry number, source information, and date.

Editing Fingerprint Cards
Right-click a collected fingerprint card and select Edit to enter the collection details. Fill in the available fields as accurately as possible and save the card.
The form includes fields for the date, case number, lift number, offense or victim, location, item or surface the print was lifted from, collecting officer, ID number, and agency or office.
-
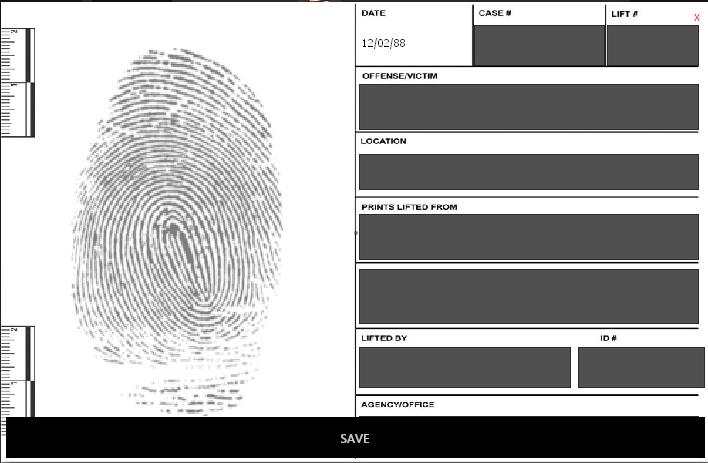
The fingerprint editing form.

Use specific descriptions so another investigator can understand the sample later. For example, identify which door was examined or record the displayed name and identifier of a weapon. Do not label a sample with an identity that has not been established.
Comparing Fingerprint Cards
- Right-click one of the collected fingerprint cards.
- Select Compare Cards.
- Enter the first string of numbers at the top of the other card: its fingerprint card number.
- Read the result displayed in the top-right corner of your screen.
- Record which samples were compared and the result.
The fingerprint card number is not the same as the database entry number or a case ID. Use the number at the top of the card for this comparison.
To search for matching records throughout the database, see Database-Wide Comparisons.
Door Fingerprints
Doors must be treated with latent powder before their prints can be lifted.
- Look directly at the door.
- Right-click the Fingerprinting Kit and select the option to apply latent powder.
- Inspect the revealed prints and their timestamps.
- Take a backing card from the kit if you do not already have one.
- Look at the door and use the backing card's fingerprint collection option.
- Label the sample with the door's location and record the relevant timestamps.
-
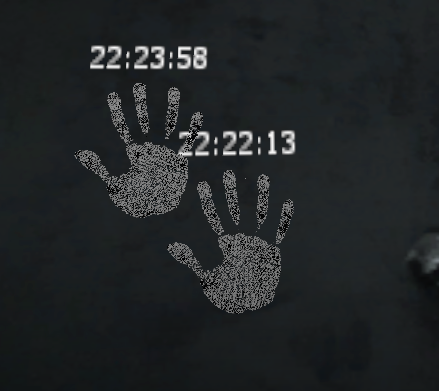
Prints revealed on a door after applying latent powder.

The timestamps use the timezone of the player who applied the powder and display hours, minutes, and seconds in 24-hour time. Record the timezone when comparing these times with another investigator's notes.
Bullet Casings
Bullet casings can be left after a PK. Hover over them to see the casing type. This can help narrow down which type of weapon was used, but does not by itself identify a specific weapon or shooter.
Photograph the casings in their original position, note their location and type, and collect them in an evidence bag. Use the backing-card procedure to recover fingerprints from the supported casing evidence, then label the sample with its source.
-

An example of bullet casings on the ground.

Blood Samples and DNA
Blood samples contain DNA. They can be collected from a living person, a corpse, or a supported blood stain left after a PK.
- Take a backing card from the Fingerprinting Kit.
- Look at the person, corpse, or blood stain you want to sample.
- Right-click the backing card and use the blood-sampling option for that target.
- Record the source of the resulting sample.
For living people, follow the authority and cuffing requirements described above. Blood sample records use a similar format to fingerprint records.
Blood Stains
A blood stain associated with a PK displays identifying text when you hover over it. This distinguishes it from an ordinary blood decal left by an injury.
-
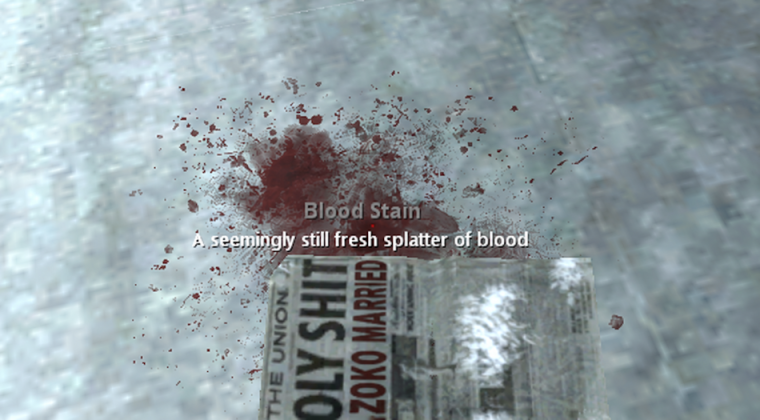
A blood stain displaying its identifying hover text.

Search the surrounding surfaces as well as the ground. Blood can appear on ceilings in indoor scenes. The position of a stain may help reconstruct where a person was shot from; record the observation separately from your interpretation of it.
Keep samples from different sources clearly labeled. Blood collected directly from a body and blood collected from a nearby stain are separate pieces of evidence.
Gunshot Residue
Gunshot residue, commonly abbreviated to GSR, is tested using a Gunshot Residue Test Kit. The kit can be used on a living person or a corpse to check for recent firearm use.
Unlike the Fingerprinting Kit, the GSR kit does not require you to remove a backing card.
- For a living subject, establish the required consent or other authority and ensure that the subject is cuffed.
- Look directly at the person or corpse.
- Open your inventory and right-click the GSR kit.
- Use the testing option and read the result.
- Record who was tested and the result.
A positive result can help establish that someone recently fired a gun. On a victim, it may support the possibility that they fired in self-defense. Consider the result alongside the injuries, casings, and other evidence; GSR alone does not establish which weapon was used, who was shot, or who fired first.
Crime Scenes
Securing the Scene
When a body is discovered, call for assistance and establish a perimeter using police tape.
- The hot zone is the area inside the tape. Personnel entering this area to process the scene should have the appropriate protective equipment.
- The cold zone is the area outside the tape. Supporting officers should manage spectators and prevent unauthorized entry into the hot zone.
Check that you have the necessary equipment before beginning. Keep the scene undisturbed until its original condition has been photographed.
-
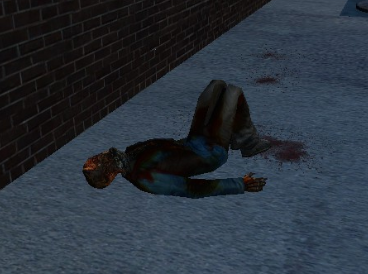
An example of a body available for forensic examination.

Photographs and Scene Preservation
Take several photographs from different angles before moving evidence or processing the body. Include the overall scene and closer views of important evidence.
The camera's automatic /me can be delayed, so take multiple photographs and check that you have documented the scene. Another officer saying that they took photographs should not replace collecting your own record of the scene.
Use the Crime Scene Marking Case to mark evidence locations as part of your documentation. Forensic Chalk freezes a body in place. Without it, the body behaves like a normal ragdoll and can be picked up and moved. Preserve a photographic record of its original position.
Examining the Body
Look at the body and press your Use key (default E) to inspect it. The examination provides the body's name, number of injuries, and injury types, such as gunshot or blunt-force wounds.
Record the detailed examination or autopsy findings before bagging the body. The corpse report generated later does not preserve the specific injury types.
Use the appropriate tools to collect blood samples and test for GSR. During the investigation, consider who the person was, how they died, what happened at the location, and which evidence may connect another person to the incident.
Searching for Further Evidence
Search for weapons, casings, blood stains, and supported fingerprint sources around the body. If a weapon is not found within the original perimeter, check the surrounding area. Expand the hot zone if more evidence is found outside it.
Photograph and label evidence as it is collected. Check doors and nearby surfaces, including ceilings in indoor scenes, rather than limiting the search to the ground immediately around the body.
Bagging the Body
Bagging the body should be the final body-processing step. Complete the photographs, examination record, sample collection, and relevant GSR testing first.
- Look directly at the body.
- Open your inventory and right-click the Body Bag.
- Use the option to bag the body.
- Check the bagged body in your inventory. It will identify the person contained within it.
- Once processing is complete, right-click the bagged body and use the disposal option to turn it into a corpse report.
The corpse report includes the person's name, number of injuries, and whether GSR was found. It does not preserve the specific types of injuries shown during the examination. Keep the detailed examination record alongside the corpse report.
Evidence Storage
Store physical evidence needed for an ongoing investigation or proceedings in an evidence locker or another authorized faction evidence-storage account. Follow your faction's storage and reporting procedures so that other investigators can locate the evidence when needed.
Label samples with their collection details and record where physical evidence is stored. The forensic database organizes sample records and reports; physical evidence still needs to be stored appropriately.
Forensic Database
Accessing the Database
Use a police computer with an appropriately authorized character and select Forensics Database from the main menu. If the option is unavailable, check your role's access with faction leadership.
-
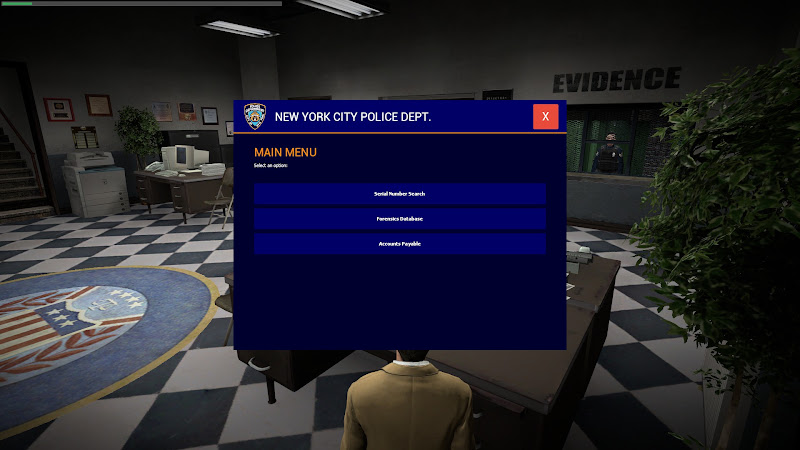
The police computer's main menu.

The database contains forensic records, including:
- Fingerprint samples
- DNA samples
- Corpse reports
-
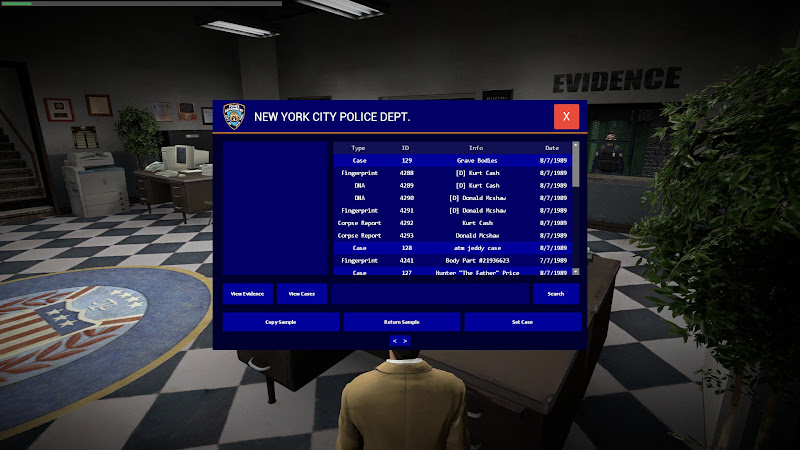
The forensic evidence list.

Select View Evidence and use the search field to locate records by the available date or name information. Check the entry's type, ID, information, and date to ensure that you are working with the correct record.
The sample image shown in the interface is a visual illustration. Use the system's comparison tools to determine whether samples match, rather than comparing the pictures by eye.
Copying and Returning Samples
- Copy Sample places a copy of the selected sample in your inventory as if you had collected it yourself.
- Return Sample removes the inventory sample through the database interface so that you do not leave a loose document behind. This should not be confused with deleting the stored database record.
Creating a Case
- Select Set Case, then Create New Case.
- Leave the Case ID field blank. The database generates this number.
- Enter a meaningful case name, such as the victim's name or a description of the incident.
- Enter the relevant case details.
- Select File Report.
- Find the case under View Cases and note its generated ID.
-
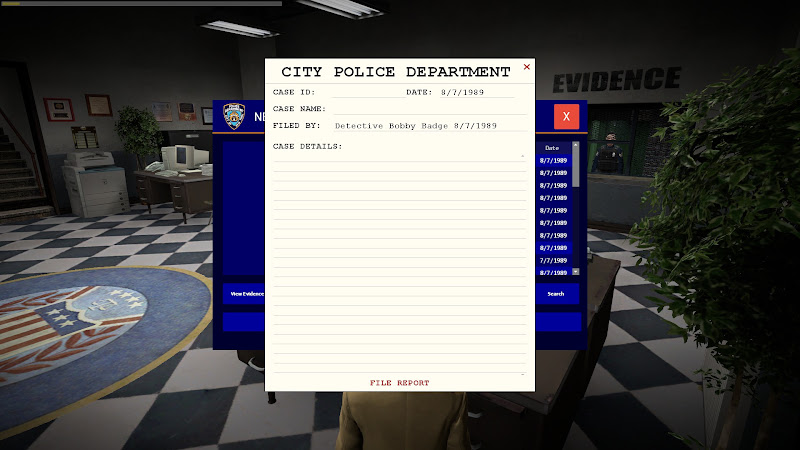
The new-case form. Leave Case ID blank when creating the case.
-
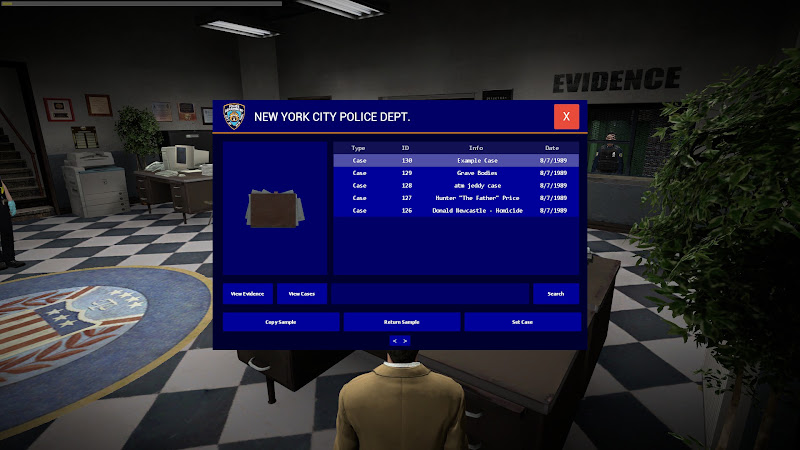
The case list, showing the generated case IDs.


The case details should support the fuller scene report required by your faction. Creating the case does not automatically attach all of your evidence to it.
Adding Evidence to a Case
- Select View Evidence.
- Find the sample or report you want to add using its date and identifying information.
- Right-click the evidence entry.
- Select Add to Case by ID.
- Enter the ID generated for your case.
- Repeat for the other relevant records, then check the case's evidence list.
-
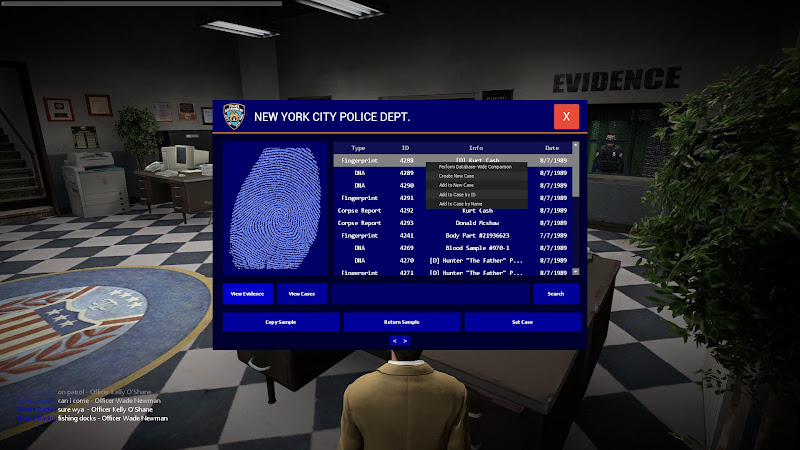
The evidence context menu, including Add to Case by ID and the database-wide comparison option.

The case ID, database entry ID, and fingerprint card number serve different purposes. Use the case ID to organize records into a case and the fingerprint card number when directly comparing two cards.
Database-Wide Comparisons
A database-wide comparison checks a sample against other stored evidence of the same type.
- Find the sample under View Evidence.
- Right-click the entry and select Perform Database-Wide Comparison.
- Read the comparison report placed in your inventory.
- Locate that comparison report in the database using the search field.
- Add the comparison report to your case using Add to Case by ID.
For example, comparing a fingerprint can reveal other objects or locations where the same print was recovered. If the person's identifying prints have not been entered into the database, a result may connect several pieces of evidence without providing the person's name.
An unidentified match is still useful. Review the linked evidence and its collection details to determine where and when the same print was previously found. Do not assume a comparison failed simply because it did not identify someone by name.
Remember to attach comparison reports to the case separately from the original samples.
Completing an Investigation
Before finishing, check that:
- The scene was photographed before evidence was moved or the body was processed.
- The detailed body examination was recorded before the body was converted into a corpse report.
- Collected samples are labeled so that their sources can be identified.
- Relevant items, doors, casings, and blood stains were checked.
- GSR results and sample comparisons were recorded.
- Physical evidence is in approved storage.
- Relevant samples, the corpse report, and comparison reports are attached to the correct case.
- Unresolved questions are distinguished from findings supported by the evidence.
Complete your faction's scene report with the case ID, location, collection details, photographs, examination findings, test results, and evidence storage information. Include timestamps and timezones where they are relevant to the investigation.